Dave McLean Photography Blog

My photo
Welcome, My name is Dave McLean, I'm 40 years old, married with 2 children and live in the UK. I have been interested in photography for about 8 years now and hope to use this blog to share my pictures and anything photography related I come across.

Saturday, 31 July 2010

Five Photo Ideas for Shooting Close to Home


Sent to you by mcleanfamily88 via Google Reader:


via Digital Photography School by Guest Contributor on 7/30/10

A Guest Post by Wayne Turner from http://www.21steps2perfectphotos.com

It's Saturday morning, a beautiful day and your photography juices are flowing. Your trigger finger is itchy and you just want to get out and shoot photos. You pick up your gear bag, take a step towards the door and then stop. What are you going to shoot? The inspiration bank is suddenly empty.

I have been in this position often and my solution has always been to go to the ideas book I keep. Like a photo journal of thoughts and ideas. Always keep one with you and as soon as you get an idea, write it down. Out of this ideas book comes five photo ideas close to home. Why close to home? The more difficult it is to get to a location the less likely you are to go there so you need to make it easy.

1. In the Kitchen

Image by limonada

Don't laugh or discard this idea before trying it. I was standing in front of the sink the other day and realised a great photo opportunity was staring me in the face. There in two large jars was a variety of kitchen utensils just waiting to have their photo taken. Full of holes, texture, pattern and all shiny and bright with great reflective surfaces. The draws are full knives, forks and spoons. How much more could you ask for. If you have a macro lens, macro feature on your lens or compact camera then this is for you. Try it and see just how rewarding it can be. The kitchen is a great place to learn digital photography and the weather will never affect it. Just watch out for the water sprayer. But don't just limit yourself to the kitchen, try the bathroom (not toilet) and other parts of the house.

2. The Garden

Image by Ashley Rose

One step away from the front door is the garden. And, I'm not just talking flowers and insects here. Look around and see what there is. Get down low and explore the ground and you'll be surprised what you see. The cracked pathway, a coiled hosepipe or a rusty hand trowel standing in a flower bed. Metal buckets, watering cans or wheelbarrows all have photo potential. Just be prepared to look and start seeing with a photographer's eye. You will surprise yourself. Again, a macro lens will be great but you won't necessarily need a macro feature.

3. The Driveway or Garage

Yes, still close to home and many opportunities. The family car if you have one, or, perhaps the neighbour's motorcycle if you don't, makes a great subject. Getting in close on the most boring car can give you images that you never thought were possible. Key here is to experiment with angles and get in as close as your lens will allow. Focus on colour, reflection and lines. Lie down on your back and shoot up. If the car is old then focus on damaged parts like rust. There are just so many little things you can shoot and when viewed up really close can give an amazingly abstract image.

4. The Park or Public Gardens

Image by Chaval Brasil

Around the corner for many of us is a park, public garden or kids play park just waiting to be photographed. Here you'll find all sorts of objects from sculptures to water fountains, play equipment to stone walls.

When you get there just sit and observe and try to see the potential photo opportunities. Allow yourself to start seeing rather than just looking around.

5. The Local flea or Street Market

Image by funadium

Street photography is a real hot photo topic at the moment. Going into a flea market and shooting just anything, from people to colour to antiques and art are just some of the ideas. Be sensitive to people and when shooting close up ask their permission. You'll find so much atmosphere and activity that will stimulate you to shoot many interesting subjects. This is a great place to learn digital photography because the opportunities and ideas are so diverse.

These five photo ideas close to home will hopefully inspire you as you learn digital photography and add skills to your photography journey. Shoot regularly and don't allow a few obstacles to stop you taking great images.

Share Your Ideas and Shots

Over the next few days – try some of the above photographic subjects and come back to share your best shots in comments below.

What other 'close to home' photo subjects have you enjoyed photographing?

Post from: Digital Photography School - Photography Tips.

dpsbook.png

Five Photo Ideas for Shooting Close to Home


Things you can do from here:


Saturday, 24 July 2010

Ten Photowalking Tips


Sent to you by mcleanfamily88 via Google Reader:


via Nicolesy by Nicole on 7/23/10

Photowalking is a really fun way to socialize and get some awesome photos in the process. Here are some quick tips to help you out, especially if if it's your first photowalk.

Know what to expect. Take a look at the info before you arrive so you know what you will be doing. Take note of the meeting location, route, time, etc. … some even have meet-ups afterward the walk and it's good to know all of this info in case you get separated from the main group during the walk.

Get the group photo right away! If you're leading a walk make sure you get the group photo before you start walking! People spread out and leave early, so if you get it right away then you won't have to chase people down or miss out on the group shot altogether.

Keep yourself safe & comfortable. A photowalk typically involves walking and moving around (yes, it's true). ;) Be sure to wear comfy shoes so your feet stay happy. It's also a good idea to bring or wear sunscreen if it's a sunny day, wear appropriate clothing and bring a good water bottle if you think you'll get thirsty. Most photowalks don't provide these things for you so you're on your own … just know your needs and be prepared.

Any camera is fine! Photowalks are not just for "photographers" … these events are for anyone with a camera! You don't need to be a "professional" with a huge SLR to attend a photowalk. Bring any camera you have, even if it's the camera on your phone. :)

Minimize your gear. Now, this is just a personal preference, but I like to usually bring only one camera and one lens. Sometimes I'll carry around a few small lenses, but I don't tend to bring my entire camera bag. I do see some people toting around lots and lots of gear, and there's nothing wrong with that, but if the walking distance is pretty far then all that gear can really weigh a person down. Plus it's fun to be challenged creatively to only shoot with one lens.

Don't be shy! A photowalk is not just about the photos, it's about meeting up with friends and meeting new ones. I sometimes get wrapped up in the people aspect that I forget I'm there to take photos. :)

Stay with the group. Photowalks, especially big ones, will mean that there are a lot of people heading in the same direction and should end up at the same place in the end. The groups usually spread out, but it's a good idea to stay near the main group or at least be sure you are with a few other people and not out on your own. Safety is always the top priority in any photowalk, and there's always much more safety in numbers.

Take lots of photos. Photography is, of course, the main reason for the get-together. It's up to you to snap away … the majority of photowalks are not training events, you will mostly just walk around and take photos of whatever you like. A fun way to find things to photograph is to give yourself a theme, and then try and find things that fit the theme.

Share your photos. After the walk it's always fun to see what everyone took photos of. A photo site like Flickr is a great place to share the photos from the walk … just create (or join) a Flickr Group where all the walkers can post their photos. Groups like these are also great places to share upcoming photowalk events.

Have fun! This is pretty self-explanatory, but the whole point of a photowalk is to have fun doing what many of us love … photography! Try not to take it too seriously and just go with the flow.

Copyright (c) 2010 Nicolesy, Inc - Nicolesy (All Rights Reserved)


Things you can do from here:


How to Help Avoid Memory Card Data Loss – Part I


Sent to you by mcleanfamily88 via Google Reader:


via Photofocus by scottbourne on 7/24/10

Post by Andrew Darlow – Follow Andrew on Twitter

Due to the growing popularity of digital cameras, removable memory cards have become our "new film." Some popular types of memory cards include SD/SDHC (Secure Digital), CF (CompactFlash) and Memory Stick. But as with any digital storage media, there are always risks of data loss either due to user error or data corruption. In this article, I will share a few tips designed to help you avoid memory card data loss.

1. Turn your cards over as they are used and use a memory card case. With 35mm film, it was easy to distinguish between exposed and non-exposed rolls. Exposed rolls had no film leader sticking out, which was required to load the film. That's not the case with memory cards, so one good way to know that you've already filled a memory card is to turn it over and put it in a separate place from the cards that you haven't used yet. I learned this tip from Vincent Versace when I viewed one of the online Epson Print Academy videos a few years ago. All memory cards I've seen have one side that has a company or brand name and another side that has a black-and-white label (or it is blank).

There are many memory card cases available on the market. In the photo above, two of the card cases I've used are shown with cards ready to be inserted into a camera (they are placed in the left side of each case), and cards that have been used but not yet downloaded (they are placed in the right side of each case).

2. Carry your cards with you at all times. Depending upon where you are shooting and how much gear you have, it's possible to forget a camera bag or memory card wallet after putting them down while shooting or taking a break. And there's always the possibility of theft. Equipment can be replaced, but often, photographs can't be retaken. I'm especially thinking of wedding, sports and special event photographers when discussing this topic. I prefer a small, fanny-pack type bag for carrying my cards since I can wear it at all times, even if I have another bag on my shoulder or back.

Another option is to wear your cards around your neck or waist using a passport holder neck pouch or money belt. If you are unable to turn the cards over and have them stay snugly in place as I described in Tip #1, one section of the pouch or belt can be dedicated to full cards, and another can be used for cards that are ready for use.

3. Always format your cards in camera. This is probably the most important tip of all. Never format your cards using a computer. Instead, after inserting your memory card into your camera, navigate to the menu option that reads "Format" and format the card when you use the card for the first time, or reformat the card in your camera after downloading and backing up your data onto a computer.

While doing some research for this article, I came across a tip by Scott Bourne in this article in which he recommends pre-formatting your media cards. This is a great time-saving tip, especially if you have dedicated a number of cards to be used with one camera. If you use the same group of cards for multiple cameras, I would then wait to format the cards until they are inserted into a camera, even if the camera models are the same.

In Part II, I'll cover more ways to help avoid memory card data loss.

____
This post sponsored by WHCC – White House Custom Colour – Get Five Free 8×10 Prints From WHCC


Things you can do from here:


Friday, 23 July 2010

Photoshop: how to use textures and layer blending


Sent to you by mcleanfamily88 via Google Reader:


via PhotoRadar Techniques by Amy Davies on 7/23/10

In this Photoshop tutorial you'll find out how to get creative with Layers, Layer Masks, Blending Modes and Adjustment Layers to apply stylish texture effects to your photos

Combining or 'layering' several images together is an excellent way to achieve a photo with real sense of mood, and is a great way to add another dimension to your work. The process used to involve complicated in-camera multiple exposures or even more difficult-to-master darkroom skills. These days, the digital darkroom makes things simple and in this Photoshop tutorial we'll show you how easy it is to get amazing results with the minimum hassle. This video will show you to combine the imain image with a textured abstract image and a film effect border. Once you've mastered the art, don't forget you can download 100 free textures and 50 free photo frames and borders – just follow the links on the right.

Photoshop: how to use textures and layer blending

read more…


Things you can do from here:


Wedding photography tips: a guide to posing wedding groups


Sent to you by mcleanfamily88 via Google Reader:


via PhotoRadar Techniques by Amy Davies on 7/23/10

Follow David Pearce's wedding photography tips and you'll be co-ordinating a group of wedding guests and making them look their best in no time.

David Pearce's book Wedding Photography: A Guide to Posing is packed with hundreds of tips and fantastic photography examples to inspire both professional and amateur wedding photographers. Designed to fit into a camera bag for quick reference, here is a small taster of what's on offer from the book, available to buy now from Oliver Cameron. Taken from the Family and Groups chapter, this guide will help you shoot beautiful group portraits, often one of the most stressful and time consuming parts of the day.

Wedding photography tips: a guide to posing wedding groups

read more…


Things you can do from here:


Thursday, 22 July 2010

How To Find The North Star And Why You’d Want To


Sent to you by mcleanfamily88 via Google Reader:


via Digital Photography School by Peter West Carey on 7/22/10

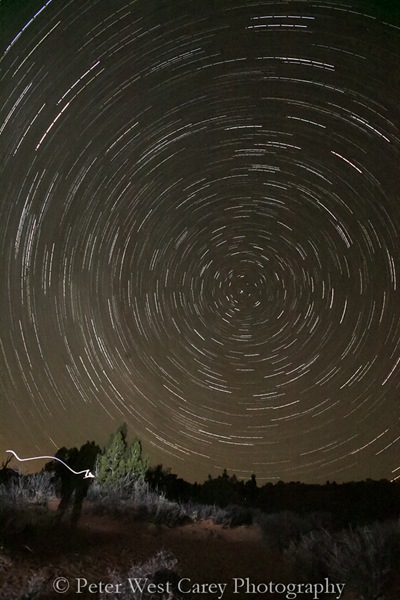
Pole-Star-Light-TrailsAnd before those of you in the Southern Hemisphere jump all over the title, with its clear Northern Hemisphere slant, don't worry, I'll be talking about the Southern Cross (Crux) as well.  There just wasn't room in the title to fit in all of that.

Let's start off with the 'why' and then move to the how.  For those of you well versed in astronomy this may all seem very simple to you and you're welcome to skip right over.  But as I've traveled I've been amazed at how many people, while sitting around a campfire or on a beach, can't find the North Star or Southern Cross.  I'll admit, for most people, it doesn't matter.  They just like seeing stars overhead, making up constellations and looking for shooting stars.  And that fine.  But if you are looking to take pictures of the night sky, it can be helpful to find either the North Star (Polaris) or Southern Cross.

The reason is that it will tell you how light trails from the Earth's rotation will show up in your picture.  Are you looking for streaks across the sky when using a long shutter speed or stacking photos?  Or do you want that cool circular effect?  It can be fun to play with different directions and foreground objects and unless you're familiar with finding the right locations, it can be tricky.  First, some explanation.

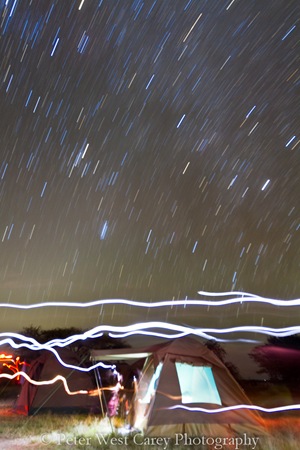
A Pole Star is a star that sits near the point of rotation for the axis of the Earth directly above either pole.  In the case of the North Pole, it's the North Star. In the case of the South Pole there currently is not a single star close in that is easy to spot with the naked eye, so the Southern Cross is often referenced.  Unless you are on the equator, you can only see one or the other (or very high up a mountain near the equator, like Mt. Kilimanjaro).  When you point a camera at either Polaris or the Crux and leave the shutter open for a while, you'll get a swirled pattern as you see in the photo above (shot in Arches National Park, Utah, USA).  If you point the camera away from the pole, you'll get more gradual curves depending on your location.  The photo at the bottom of this post was taken near the equator, in Serengeti National Park, Tanzania, while pointing Southwest.

Speaking of location, let's find the North Star.  It's fairly simple and you only need to know one constellation, the Big Dipper or Ursa Major.  I usually reference this constellation rather than the Little Dipper (Ursa Minor), even though Polaris is part of the Little Dipper, because the Big Dipper has 'brighter' stars (I know I'm disturbing some astronomers out there with a few colloquial terms and I apologize).  Once you have found the Big Dipper, connect the dots from the bottom of the outside of the dipper (farthest from the handle) to the top of the outside of the dipper.  Now follow that line until you meet the next bright star.  That's Polaris and it is at the tip of the handle of the Little Dipper.

Serengeti Star Trails As I have practically no experience finding the Southern Celestial Pole, I'm going to borrow from Wikipedia (this is where the astronomers can jump in and give some pointers (har har har)) "Since the southern sky lacks an easily visible pole star, Alpha and Gamma (known as Acrux and Gacrux respectively) are commonly used to mark south. Tracing a line from Gacrux to Acrux and extending it for approximately 4.5 times the distance between the 2 stars leads to a point close to the Southern Celestial Pole. Alternatively, if a line is constructed perpendicularly between Alpha Centauri and Beta Centauri, the point where the above mentioned line and this line intersect marks the Southern Celestial Pole. The two stars of Alpha and Beta Centauri are often referred to as the "Southern Pointers" or just "The Pointers", allowing people to easily find the asterism of the Southern Cross or the constellation of Crux."

A helpful reminder when finding either celestial pole is they are as far off the horizon, North or South, as you are from the equator. In other words, the photo at the top was taken in Utah at approximately 38.7°North Latitude, so the North Celestial Pole is 38.7° off the horizon to the North.  This is helpful for visualizing a trip in advance.  If you know your latitude, you can guesstimate what your star pattern will look like.

And that's the how and why of finding either celestial pole.  Armed with that knowledge, and the DPS post 4 Steps to Creating Star Trails With Stacking Software, it's time to head outside when the sun goes down and see what you can create!  Feel free to post some of your memorable star trail photos in the comments section.

PHOTO NOTES: The top photo is a stack of 36 images taken over 51 minutes. Each image is 75 seconds in duration shot at 16mm, ISO 1250 f/6.3. The second photo is one single image lasting 618 seconds, f/2.8, ISO 400, 16mm.

Post from: Digital Photography School - Photography Tips.

dpsbook.png

How To Find The North Star And Why You'd Want To


Things you can do from here:


Five of the Best Photography Tips Ever That Don’t Involve Gear or Camera Tec...


Sent to you by mcleanfamily88 via Google Reader:


via Photofocus by scottbourne on 7/20/10

Copyright Scott Bourne 2004 - All Rights Reserved

It's easy for me to write photo tips. I've done it pretty much every day since November 1, 1998 when I published the first edition of Photofocus online. But it's harder when I constrain myself and don't talk gear or technique. This is the meaty stuff that actually makes you think. Some of my audience don't like these tips as much because they require you to stop and invest your soul into a photo. It's much easier to hope for a magic button to press to get a great shot. Well sorry, this isn't a magic button kind of post – so get your thinking caps on!

Tip #1. Aim for quality over quantity. What if you limited yourself on your next outing to just one photograph? You couldn't shoot more than one subject. You couldn't shoot with more than one lens or in one location. If you did that, you'd be photographing to make a point – to tell a story. Try to FEEL your next photograph. Limit yourself. Think about it. Plan it. Work hard to research where and when you'll make that image. Get to know your subject. In this scenario, you literally only get one shot.

Tip #2. Keep a notebook handy at all times. I love to keep a little Moleskine Notebook with me most of the time so that I can write down notes about things that visually inspire me. Whenever I get into a rut, I start paging through my notes to see if I can find something that shakes some fruit out of the tree. A more modern-day equivalent would be an audio recording device such as the voice recorder on an iPhone. I do think however that there is some additional value in being forced to write something down. It sticks better.

Tip #3. Start teaching. No matter where you are in your photographic journey, you know at least one more thing than someone else does about photography. Find someone who you can help and go do it. I spend more time teaching these days than shooting, yet, I am convinced my work is actually improving. One of the reasons is that the old adage is true – if you really want to learn how to do something, agree to teach it.

Tip #4 Shoot for yourself. No, I mean really shoot for yourself. Think of a photo project you've always wanted to do. Only this time, think of it as a private project. YOU are the audience. You have to make a pact with yourself. You will NEVER, EVER show the images from this project to ANYONE. In fact, you will delete the images once the project is over – all except for one which you will use as a reminder that shooting from the heart makes the best photograph.

Tip #5 Avoid cliches. Think about the current "trends" in photography. How many times will I be forced to look at a beautiful model standing in the lake with her head just above water at sunset – lit in "strobist" fashion? I see hundreds of these shots. Joe McNally really made this concept popular by putting this shot on the cover of one of his great books. But you going out to duplicate that shot isn't really you shooting. It's you imitating. Don't get me wrong, there's value there. You can learn how it was done. But what I really hope you can do is find your true self in your next big image. You don't have to concentrate on breaking the rules or being gaudy for shock value (Thank you Lady GaGa) – but try to focus on what you really want to say with your camera. Do you want to make images that last? Do you want to make images that really stand the test of time? Then be yourself. Shoot for yourself. Shoot what your heart wants you to shoot. Don't just try to be cool for being cool's sake. Be true.

scancafewide


Things you can do from here:


Still Shooter’s Quick Guide To Motion Video W/Hybrid DSLRs


Sent to you by mcleanfamily88 via Google Reader:


via Photofocus by scottbourne on 7/21/10

As still photographers, the last thing we're usually looking for is a moving camera. We often like to lock down our camera on a tripod and make sure it's rock solid still to avoid blur in our photos.

If you own a DSLR that also shoots high quality video, you will eventually realize that in video – everything moves – including the camera. Knowing HOW to move the camera and make the video still look great requires skill and practice.

Even if you don't have hundreds of thousands of dollars worth of cool studio gear, you can still make smooth, cool-looking camera moves if you know what you're doing.

Start Slow

The first tip is slow down. You don't want to give your audience motion sickness. Move the camera somewhat slower than you would turn your head if you were in a brace. Most of the video I've seen shot by still shooters contains moves that are simply too fast for the audience.

Avoid jerky movements. Think smooooooth. The smoother the better. This really takes practice. Even though I've been shooting more video than stills lately I find myself needing to practice each move several times before I hit the record button.

Panning & Titlting

Practice the move before you can make it. Twist your body in a pan and when tilting, try to make sure you move in a straight line.

Home Made Dolly

Does your kid have a wagon? All you need is a piece of plywood, the wagon and a small tripod and you can set up your own dolly moves. Just be sure to start and end carefully and slowly to make sure your camera doesn't fall over.

Stabilization

Speaking of tripods, buy the most expensive tripod you can afford. A good fluid head will greatly aid your ability to make good camera moves.

I recommend watching lots of video shot by people like Phil Bloom (http://philipbloom.net/) and Vince Laforet (http://blog.vincentlaforet.com/). They know what they are doing and you can learn a lot just by watching their results.

______
This post sponsored by LEDZ – LED lights for photography and video.


Things you can do from here: