Dave McLean Photography Blog

My photo
Welcome, My name is Dave McLean, I'm 40 years old, married with 2 children and live in the UK. I have been interested in photography for about 8 years now and hope to use this blog to share my pictures and anything photography related I come across.

Sunday, 15 August 2010

6 Tips for Setting your Photography Prices

6 Tips for Setting your Photography Prices: "

Do you feel completely in the dark about setting your prices? Do you have a formal price structure or are you just coming up with numbers? Do you constantly change your price list? Then you’re just like me. Well…me a few months ago anyway. It’s funny – you can be the best photographer, but knowing what to charge can be an un-slayable dragon. And when you’re not quite sure why you charge what you charge, it’s hard to remain firm on your prices when your clients want to haggle you down to nothing. I learned everything I needed to know about setting my prices from Alicia Caine’s eBook. I’m not getting paid for telling you that. I swear by that book. It changed the entire face of my business.


These are the top three things I learned from Alicia’s book:


  1. You should publish some of your prices on your website. This is the first step in managing client expectations and not getting the sticker-shocked client trying to weasel their way out of paying your prices. Just publish a couple of guide prices as a reference.

  2. I don’t have to do friends and family discounts. I don’t do mates rates. I don’t expect them from others and I don’t give them. Well…I don’t allow it to be expected. But I might knock some off or give an unexpected gift to a friend. In my experience, it just doesn’t go well when I under price my services. They value me less and I feel a bit of resentment about spending an entire week editing a wedding I was expected to do for free. Alicia empowered me to say no.

  3. There are a few very easy calculations you can use to price your stuff in a way that keeps everything nice and uniform and my pricing makes sense. I used to price my stuff according to the square inches of the product. Lol that took a bit of work! Alicia’s calculations are waaay easier.


Here are a three points about money I’ve learned the hard way, in no particular order:


  1. ALWAYS charge a session fee. And always charge up front when making the session reservation. This means the clients are serious and aren’t going to take up half a day on your calendar and leave you hanging. Don’t just take a deposit. Take the whole thing. I’ve had plenty of deposit-leavers leave me hanging, but no session-payers have let me down yet. Taking the money upon reservation (I either send them a self-addressed envelope or shoot them a PayPal invoice) falls under the category of ’spent money is forgotten money’. So a week later when it’s time to buy photo products, they don’t feel like their bank account just took a hit and they’re free to spend on photos. And they WILL spend because they’ve already made a financial investment. Not to mention an emotional and time investment during the session.

  2. ALWAYS make sure that you make it clear that the deposit/prepaid fee is non-refundable. They can sign a contract (a little too formal for me) or acknowledge receipt of your confirmation email by saying that they understand the fee is non-refundable.

  3. When you put a client gallery up for preview, give it an expiry date. I still have clients from a year ago who haven’t ordered. Put the gallery up for 30 days and for goodness sake, WATERMARK those suckers allover the place. It’s ok to ruin the preview with a watermark and make it clear that swiping the preview is stealing.


What aspects of pricing do you feel in the dark about?


Post from: Digital Photography School - Photography Tips.


dpsbook.png


6 Tips for Setting your Photography Prices


"

Things That Make Images Weaker

Things That Make Images Weaker: "

bad


During reviews in my workshops we discuss what keeps some images from working better and how they could be improved.

Here’s a list we compiled during my recent Iceland workshop.

Avoid these thing and make your images stronger.


Lack of Focus (Not Deliberate)

Limited Depth of Field (Not Deliberate)

Motion Blur (Not Deliberate)

Chromatic Aberation

Noise (Not Deliberate)

Posterization (Not Deliberate)

Lack of Shadow and/or Highlight Detail (Not Deliberate)


Color Contrast Between Elements Not Strong Enough

Low Contrast Light


Cropping Seems Accidental Rather Than Deliberate

Distracting Elements on the Frame

Almost Centered (Neither Centered Nor Significantly Off Center)


Too Many Competing Lines

Shapes Merge Becoming Unclear

Shapes Rendered Without Volume (Not Deliberate)


Too Busy (Complexity Lacks Structure)

Simple Subjects With No Counterpoint

Secondary Elements Distract From Primary Elements


Image Enhancements Call Attention To Themselves


Text Competing for Attention

Text Creates Unintended Commentary

Graphics (Text/Images) Not Integrated Into Image


Cliches

Insincerity


What else would you add to this list?


Find out about my digital photography workshops here.

"

Things That Make Images Stronger

Things That Make Images Stronger: "

good


During reviews in my workshops we discuss images made in terms of what makes them strong and how they could be made stronger.

Here’s a list we compiled during my recent Iceland workshop.

You can use any one or more than one in combination to make your images stronger.


Form

Simplicity

Structured Complexity

Gesture

Leading Lines

Interesting Shape

Clean Shape

Deliberately Incomplete Shape

Clear Figure Ground Relationships

Overlapping Planes

Strong Recession (leading lines, overlapping planes, figure ground, color)

Texture

Pattern

Structured Fields

Minimalist Fields

Selective Focus

Archetypal or Evocative Proportion

Contrast

Clean Frame

Spaciously Placed from Frame

Touching the Frame

Cropped by Frame


Palette

Color Interest

Light

Luminosity Contrast

Hue Contrast

Saturation Contrast


Content

Significant Detail

Shows Subject’s Process

Shows Media Process

Clear Stage, Actor, Secondary Character

Action

Decisive Moment

Story

Unresolved Tension

Mystery Left to Be Solved


Emotion

Emotion of Subject

Personal Emotion

Emotional Interaction

Color Mood

Atmospheric Mood


What would you add to this list?


Find out about my digital photography workshops here.

"

What Every Photographer Needs to Know about Social Media

What Every Photographer Needs to Know about Social Media: "

An introduction to social media for photographers by Australian Freelance Photographer Gemma Carr (@GemTweetAlot).


How critical is social media/marketing to your photography business?


Photographers are busy people. So too are our clients. More so than ever before we have an abundance of information available to us at the click of a mouse. It’s always evolving; full of opportunity and at times, a little overwhelming.


social media photographers


As you can see, the modern day photographer is a busy one indeed. Running a successful photography business has always been about much more than just taking great photos.


As shown in the diagram above, the skills we need as a photographer in 2010 are much more diverse. The list could go on, but, I think you will see the most notable change in skills is the web?based tools such as website/Blogs/Facebook/Twitter.


And with all the new ways to promote your business the range of options is both exciting and challenging. Wouldn’t you agree?


Which social media/marketing tools are right for you?


This is a very personal decision; it’s about finding the right fit for you, your brand and your clients. Often a combination of your preferred tools works really well.


About one year ago, I euthanised my Facebook account. A bold act at the time when I was so heavily entrenched in it, but certainly a move I have not regretted.


About one year ago I set up my twitter account. This, I can report has been the most inspirational move I have made in years.


Instead of being in touch with old high school friends (lovely as they are, we lost touch for a reason) I was now immersed in a world that spread outwards to photographers from all over the world. From my home office in Melbourne I am getting creative inspiration, ideas, technical advice and feedback from my photography and industry colleagues that I never once had.


From using Twitter and linking in to dozens of photographers Blogs, I have realized the potential power of the Blog. If utilized right, a Blog is a current, living document of your photography business. In some cases the Blog can supersede a website.


Why Blog?


Simply so that my current and future clients can get to know me… FAST! My Blog is a behind the scenes look into what I do, it’s more personable and friendly than a website. This is key for my wedding & portrait business clients.


For my commercial clients my website is a more formal introduction to me and my photography. In the short time I have had my Blog online, my enquiries have increased significantly.


Acclaimed Perth wedding photographer, Samm Blake, is testament to how well web based marketing can work:


“My entire business was built on my website, Blog, facebook and twitter!”


“My Blog is definitely the most important marketing tool for my business. It allows me to share my most current work and allows me to connect with current, prospective and past clients as well as many other photographers around the world”


Website Vs Blog


In your business, one web tool may outshine the other. Yet, what is so powerful about these available tools is how amazingly well they can compliment each other. I use my website and Blog to differentiate the services I offer. For me is all about


making it easy for people to find and to connect with me.


“Website and Blog are the most important in our business. The websites works as a medium for art directors, designers etc to look you up and see your work so it’s an important overview of your work. The Blog keeps them informed about what your doing and hopefully on their minds when a suitable job comes up. Obviously you need to promote in other ways which direct people to your website otherwise it can sit there being very idle.”


Adair Lander from Adrian Lander, Commercial Photographer, Sydney.


Shouldn’t I just be taking photos?


Whilst all this stuff sounds easy and exciting, most of it equates to a lot of time and personal input from you. All of the time spent at the computer, is time away from your camera. So, if you consider it a chore to participate in social media, then I suggest you don’t.


The inspiration I have gained from being able to connect with fellow creative people has truly taken me by surprise, yet it all falls into step behind me actually shooting.


Top tips for Blogging


  • Content is king – add regular posts that create interest for your viewers

  • Use Twitter & Facebook to attract visitors to your Blog

  • Match your Blog to your branding


Top Social Media Tips


  • Be yourself, share share share! (but not the nitty gritty details)

  • Respond to others; let people know you are alive and kicking (and interested in what’s happening)

  • Don’t try to do too much, just pick the programs that you enjoy using


At the end of the day, regardless of what decade we are in, nothing is has been or will ever be more important than taking really good photographs.


I am excited about my photography career, I hope you are too!


Gemma Carr is a Freelance Photographer from Melbourne. See more from her at her site GemmaCarr.com.au. Follow her on Twitter at @GemTweetAlot. This post was previously published in the members area of ACMP.


Helpful Links:


  • ProPhotoBlogs – add on software especially made for photographers

  • WordPress.com – free software to build your Blog

  • ProBlogger Blog Tips – a usefull resource with everything you need to know about blogging from starting up to maximizing your BLOG’s potential (also a sister site to dPS).


Post from: Digital Photography School - Photography Tips.


dpsbook.png


What Every Photographer Needs to Know about Social Media


"

Thursday, 12 August 2010

8 Tips On How to Photograph Sports

8 Tips On How to Photograph Sports: "

A Guest Post by Pamela Aurino.


1) Camera Settings – Burst mode, Focal Points & Aperture Priority


sports-photography.JPGWhen shooting any sports, make sure your camera is set to burst/continuous mode to keep up with movements of the players. This will save you having to press the button manually for every shot. Have your camera’s focus mode to AI servo mode which is made to shoot continuous movement & for panning.


Also ensuring all your focal points are active will make sure you have optimum chance of focusing on the player with the ball. When shooting sports it is ok to have the camera in Aperture Priority mode as we’re dealing with a really fast game and you need to be on the ball with exposure rather than having to always toggle the shutter speed manually.


2) Camera Settings – Shoot in JPG!


I personally shoot in jpg as opposed to RAW. When you’re taking so many continuous shots you’re going to want a maximum buffer speed. You’ll find when shooting soccer / netball tournaments, the parents buying the shots aren’t going to be too fussed on quality of the image as long as you captured something at the right time. A sporting tournament can get quite messy when you’re coming out and back off the field to download CF cards and you’re having to wait for the raw files to download.


3) Lens settings – 2.8 Is Almost An Essential!


You’re going to need a fast telephoto zoom lens when photographing sports. I shoot with a Canon 70-200 f/4 IS USM and I love it! Although indoor sports photography like bowling may require a 2.8 lens as you get another full stop of light in.


4) Lens settings – Image Stabiliser & Focus Mode


An absolute MUST when photographing sports photography is to have IS on your lens. You want to set your lens to Image Stabiliser Mode 2. Mode 1 is only made for still subjects & portraiture and won’t perform as well as the panning mode 2 in sporting situations.


Have your focusing distance range set to 3m to Infinity mode instead of 1.2m to Infinity. This will make sure you have the fastest focusing possible.


5) Note The Time of Day


sports-photography-tips.JPG
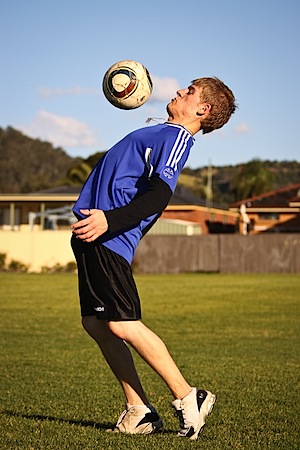
Soccer games usually run in the morning so if you’re aiming to sell prints after the game of the individual players be sure to spread out the range of players shot. There are certain players who like to step back more than others but it’s your responsibility as the photographer to record everyone and to maximise your profits.


Take note of where the sun is and make sure the sun is to your back when shooting. This will ensure you have your shutter speed on it’s maximum without having to worry about exposing for the faces of the players if you were shooting into the sun. I am willing to sacrifice a little squinting and panda eyes from the players to ensure I get the right exposure. After all if you don’t nail that exposure no one is going to care about panda eyes because there won’t be a shot.


Concentrate on shooting one team for the first half as they will be in the right position with the sun illuminating their fronts/faces. Then when half time is over aim to shoot all the players on the other team as they would have switched sides on the field.


6) No Eyes! No Shot!


When photographing sports, the key rule is to include the eyes of the subject and you can never fail. If you’re shooting the back of a player, STOP! ..Wait for them to turn around (or turn to another player on the field) ..and shoot when you have their eyes in the shot. The best shots in soccer are the headers and knee shots, as their eye level will typically be above parallel to the ground which is what we want. Whatever you do, don’t forget to photograph the goal keeper! He/she doesn’t have much interaction with the entire game, but the anticipation shots in between can still make great shots.


7) Include The Ball!


The eyes and the ball are two of the most important compositional elements in a shot. Then to add to the shot is the expression in the players face.


Although it can be difficult to capture, parents of the players are more likely to buy a picture that includes the game ball in it.


8) Wear an Official Photographer Vest!


Make sure you wear a big yellow/orange vest to indicate to people you are the official sports photographer. A photographer in Wollongong, NSW taped a sign on his back saying ‘Request A Shot!’ and at least that indicates to them that they are welcome to pull you aside. If you are more open to people nagging you, (yes it will be a little annoying having to be pulled aside with parents saying ‘look out for my son, number 12!’) the more sales you will make from prints.


See more of Pamela’s work at http://www.elaphotography.com.au.


Post from: Digital Photography School - Photography Tips.


dpsbook.png


8 Tips On How to Photograph Sports


"

Wednesday, 11 August 2010

13 Places to Practice Taking Beautiful Motion Blur Images

13 Places to Practice Taking Beautiful Motion Blur Images: "

1. Trains


Image by Extra Medium


The shot of a passenger waiting on a subway platform for a train with moving train behind is always a fun one to experiment with because it contrasts the speed of a train with the stationary passenger (often being buffeted by wind of the train).


These shots are all about making sure your camera is completely still (tripods are key if you can) and anticipating the moment. It’s also about framing your shot so that your subject is well positioned.


2. The Coast


Image by Timbo Don


Coastal areas can be a landscape photographers dream and are great places to capture motion blur. One place to start is by the waters edge where waves rolling in over stationary rocks, piers or sand can create a mystical foggy effect when shot with a longer shutter speed.


Image by Matthew Stewart


Don’t forget that wherever there are people – there is movement! So don’t just focus upon the water.


Image by camil tulcan


3. Spinning Children


Image by shoothead


My kids would be spun around like this all day every day so if you have kids around you’re likely to have willing subjects for this one – just be careful with smaller children as I do have a friend whose child dislocated their shoulder doing this – no photo is worth that!


To get the shot you’re going to probably need a couple of people – one to hold onto the child and the other to hold the camera around that person’s waist (or over their shoulders) in front of the child.


4. Playground Shots


Image by Soundman 1024


A variation of the spinning child shot above is to head to your local playground where there is usually a variety of equipment which is great for motion blur shots. Swings, merry go rounds, slides or pretty much any equipment that gets those on them moving are fun to experiment with.


You can either position a camera on or off the moving equipment to get different types of effects.


5. Bikes


Image by fabbriciuse


Bikes present all kinds of opportunities whether they be street shots (above), competitions below or actually getting ON the bike with your camera!


Image by Mariano Kamp


If you’re going to experiment with taking photos of bikes one technique to try is slow sync flash which will give the effect of movement while also capturing a split second in time.


Image by Pörrö


6. Cars


Image by Rob Overcash Photography


As with Bikes – moving cars are an obvious place to look when you’re wanting to capture motion blur. They also present many opportunities whether it be photographing the car from the inside (above), attaching a camera to the outside of your car or actually photographing cars moving by you from outside.


Image by Ricky Flores


Image by m4r00n3d


7. The Fairground


Image by joiseyshowaa


Fairgrounds present all kinds of exciting opportunities. Many rides have both elements of movement and stationary components which can create a wonderful effect. They also often have another exciting element – light – which makes twilight photography perfect.


Image by foreversouls


Don’t discount daytime action at the fair though – there are still plenty of opportunities – particularly those to perfect your panning technique.


Image by Express Monorail


8. Dance


Image by bichxa


Whether it be in a performance, on the dance floor at a party or in a studio – dance is about movement and therefore presents us with opportunity to capture some nice motion blur.


9. Birds


Image by Danny Perez Photography


Bird photography is very popular in our forum area and among some of the best examples that I’ve seen are those that manage to incorporate a sense of movement into their shots. The key in many places is to choose a shutter speed that is slow enough to get wing movement but fast enough to keep the rest of the moving bird sharp.


Image by Midlander1231


10. Star Trails


Image by Andrew Stawarz


Stars are perhaps one of the last things one would think about when presented with the challenge of capturing motion blur – but they can also be some of the most spectacular images.


11. Escalators


Image by Gerrit Wenz


I have a number of friends who just LOVE photographing escalators and who have spent many hours capturing the smooth movement that they create. Many of their shots have the camera on the escalator and include a subject to give a point of interest – they’re often taken at night so as to capture colorful ambient light in the tunnels around their favorite escalators.


Also consider shots of those passing by on escalators with the camera position off the escalator.


Image by sinkkd


12. The Umbrella Shot


Image by Digimist


This is an oldie but a goodie. To add a little interest to a portrait have your subject hold an open umbrella over their shoulder and behind their head and then have them slowly twirl it.


13. The Street


Image by Digital Pimp


If I’m ever at a loss for subjects to photograph I just head to the most busy street corner I can find in what ever city I’m near. The hustle and bustle of the street is a never ending supply of movement to capture.


Image by gaspi *yg


Image by quas


Image by Steve Webel


Of course this list just scratches the surface – pretty much anywhere there is movement you can capture motion blur! Where else have you experimented with taking motion blur shots?


Post from: Digital Photography School - Photography Tips.


dpsbook.png


13 Places to Practice Taking Beautiful Motion Blur Images


"