Dave McLean Photography Blog

My photo
Welcome, My name is Dave McLean, I'm 40 years old, married with 2 children and live in the UK. I have been interested in photography for about 8 years now and hope to use this blog to share my pictures and anything photography related I come across.

Monday, 19 July 2010

Breaking the Ice: Photographer-Subject Relationships


Sent to you by mcleanfamily88 via Google Reader:


via Photofocus by scottbourne on 7/19/10

Guest Post and Images by Stacy PearsallFollow Stacy on Twitter

We all have shared an awkward silence with perfect strangers on an elevator. We'd just assume stair at our feet then initiate a conversation. There's some unwritten elevator law that says no eye contact or talking is allowed.

I'm the wacky person, who actually says, "Hey there, how you doin'?"! I suppose it's my outgoing-no holds barred style, that helps break the ice. My husband, Andy Dunaway, thinks I'm crazy. I'm sure the people I engage in conversation think the same thing! LOL!

It's not that I am crazy. I'm just practicing.

Here's the secret, I'm a bit shy. If you've ever met me, you'd probably think I'm pulling your leg. However, it's true. My heart rate races when I'm in a crowd of people, especially strangers. I'm even more uneasy when it comes to one-on-one.

Over time, I learned to control my nervous response to strangers. I decided that I had to take control of my social anxiety in order to take control of my photo shoots. Ritually before every shoot, I gear my mind up for the encounter. I remind myself that I have to give a bit of myself to my subject in order to get any return. This exchange is extremely important to obtain ease during my photo shoots.

Meeting and interacting with people for me is similar to running a race or a marathon. To counter my introverted nature, I expend energy reaching out to touch strangers physically and emotionally. I greet every subject with a firm handshake, direct eye contact and a sincere smile.

For me, there is nothing worse then shaking a limp hand. I associate a soft handshake as an insecurity or lack of confidence. I suppose my prejudice derived from my days in the military.

As for good eye contact, I find this paramount. We do a lot of non-verbal communication through our eyes. So when my subject is talking, I make sure that I engage him or her through continuous eye contact. I don't check my watch, cell phone or stare at my shoes. To me, this translates into boredom and disinterest. I want to make sure that my subjects know how important they are to me.

I find that my subjects will reflect the emotions I am exuding. So if I am smiling, they will smile. If I'm nervous, are nervous. With that said, I try not to get overwhelmed during my shoots. I keep my emotions in check. I try to remember to breath as much as possible. When all else fails – stop and take a deep breath.

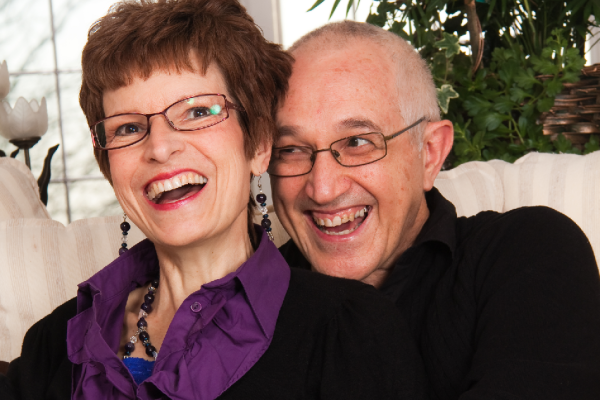
I have found that the best way to break the ice is to let my subjects talk. If the initial introduction is stiff and forced, I will try and dig out a topic they may be interested in. For instance, on this shoot my subject loved to fish. I asked him about his boat and his fishing excursions. His eyes went wide and smile flashed across his face. From there, the conversational flood gates opened.

I let him talk and engaged him with other personal questions. However, I have found that the best results come when I just listen. I take note of facial expressions in relation to the conversation topic. I use these key topics to evoke emotional-facial responses from my subjects.

In this case, my subject smiled every time he talked about his years in the Navy. I was sure to prompt a smile by asking questions like, "Where were you stationed in the Navy?" or "What type of ships did you work on?". He would smile and I would get my shot.

In most shooting scenarios, I only have a few precious minutes to break the ice and get my portrait. So all of my techniques are used from the moment I book the shoot to the time I get in my car after the assignment is complete.

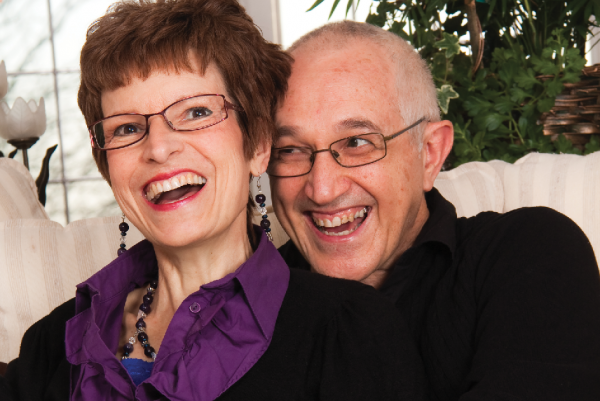
Happy subjects equal happy endings. So, bring your camera bag and your smile. Engage your subjects with sincere interest. Listen with keen ears.

If you are shy, don't despair. I have learned to engage strangers in a non-aggressive way. By the methods above, I have actually established many friendships for life.

scancafewide


Things you can do from here:


Food Photography: White Balance


Sent to you by mcleanfamily88 via Google Reader:


via Photofocus by scottbourne on 7/19/10

Salmon Before/AfterCanon 7D, Canon 24-105 ƒ/4L IS lens, 1/50th sec at ƒ/4, ISO 100

Guest Post by Nicole YoungFollow Nicole on Twitter

One of the most common challenges I have seen many new food photographers struggle with is getting proper white balance (colors) and also exposure (tones/brightness/contrast) in their food images. When we photograph people we usually have a skin tone to gauge what our white balance is, and since our minds naturally know what looks "right" it's not too difficult to find the right balance. With food it's different since the colors and tones can be whatever we make them to be, and sometimes it's hard to get the image back to those bright, vivid colors we remembered photographing.

The image above is the photo straight out-of-the-camera (left) and edited version (right). It was photographed with window-light on the right and a large silver reflector on the left to fill in shadows. My editing on this was very simple: I corrected the white-balance in Adobe Lightroom (from the RAW file), then used a levels adjustment layer for the tones, a separate levels layer for color, and added a reduced-opacity B&W overlay layer to add some contrast (you can learn how to do that last step here).

So, how can you improve the white-balance in your images? Here are five tips to get you started:

1. Photograph in daylight-balanced light. Using the light in the kitchen, which is usually going to be tungsten or flourescent, is not your ideal light for food photography (or photography in general). Use window light or speedlights/strobes to get the correct color-temperature light and you will immediately see results.

2. Make sure your computer monitor is calibrated. There are a lot of relatively inexpensive calibration tools out there. I use a very simple "Spyder Express" – the newest one on the market (the Spyder Express 3) costs around $75. This is ideal if the majority of your work is displayed online or in a computer format.

3. Pre-set the white-balance in your camera. This can be done with a fancy tool like the Expodisc ($100) or with an inexpensive $5-10 gray card (you can also find them at your local camera store).

4. Shoot in RAW format. This will ensure that you can change your white balance in your editing software if you didn't get it perfect out-of-camera (and 99% of the time you probably won't).

5. Compare your before/after image. By comparing your original image to the edited version you will have a better idea of what edits are working and what still needs to be done. You can do this pretty easily by toggling your layer visibility in Photoshop … I have a short two-minute video on this topic on my blog here.

____
This post sponsored by WHCC – White House Custom Colour – Get Five Free 8×10 Prints From WHCC


Things you can do from here:


Saturday, 17 July 2010

Photography Copyright Protection: Online Resources


Sent to you by mcleanfamily88 via Google Reader:


via A Picture's Worth | PhotoShelter by Andrew Fingerman on 7/16/10

We spend a ton of time talking about marketing photography online - helping photographers extend their reach through websites, blogs, social media, etc. So, it should be no surprise that we often get questions about protection.  There are some amazing resources for photographers to learn more about protecting their copyright.  We've taken a stab at gathering up *some* of the best resources we've found - mostly from industry organizations, government and nonprofits, and a few voices of wisdom in the industry.

Yes, getting your work online exposes you to risk of theft. And yes, uneducated web users generally have a severe lack of respect for photographers' copyright and image use restrictions. To avoid this risk you can simply not participate. Shut everything down and only share images when asked directly by a potential client. This is obviously a really bad idea, and the worst long term solution for your business. Your customers are doing business online, linking up in social networks and browsing the web, so it's where you and your images need to be if you care about getting new work. So, you'd better understand your rights and the tools at your disposal to both protect you from theft and prosecute when theft occurs.  The following should give you a good start...      

If you know of articles and resources to add to this list, please share in the comments section below. 

US Copyright
United States Copyright Office
A Brief Introduction & History
Frequently Asked Questions
Registration of Photographs
Copyright Office Fees
eCO - Electronic Copyright Submission

PhotoShelter tutorial: Electronic Copyright Registration for Photographers

International Copyright
World Intellectual Property Organization (WIPO) Directory of World Copyright Offices
Legal Pitfalls in Taking or Using Photographs of Copyright Material, Trademarks and People
WIPO Intellectual Property Handbook
World Intellectual Property Statistics

American Society of Media Photographers (ASMP) Copyright Resources
Registration ©ounts - Recordings from a full day copyright seminar in April 2010
Copyright Overview
Best Practices for Registering 
How to Register (Podcast)
What to Do if Your Registration is Rejected
What to Do if Your Work is Infringed
When is an Image a Derivative Work?
A Brief History of Copyright
FAQ on Copyright Law
FAQ on Registration
Summaries of Fair Use Cases


Things you can do from here:


Friday, 16 July 2010

Five Traits of the Greats – Photographers That Is


Sent to you by mcleanfamily88 via Google Reader:


via Photofocus by scottbourne on 7/16/10

Copyright Scott Bourne 2004 - All Rights Reserved

What do the really great photographers have in common? I mean specifically. It's more than "They take great pictures." Why? What? How? What makes them great?

I've analyzed this for most of the last two decades. I still don't have the complete picture – pun intended, but I'm getting closer. Here's what I think makes a great – a great.

(In no particular order.)

1. They hold their mud. That's an old fashioned way of saying they stake out their ground and defend it. They own their opinions. They hold fast to their beliefs. They ignore the chattering class and instead, look inward for their true self. When you study the work of the truly great masters, you will notice that they generally ignored the opinion of the critics and did what they thought was necessary to make the camera tell the story – the story the way THEY saw it. The greats don't fret. They don't sweat the small stuff. They are doers. They do. They leave others to wonder why.

2. They avoid religion. I don't mean they aren't spiritual people or that they don't go to church. I mean that they don't get too wrapped up in PC v. Mac, Aperture v. Lightroom, film v. digital, HDR v. NON-HDR, filters v. no filters. Sure the greats have opinions on these subjects. But that's it. They are just opinions. They don't spend hours writing long missives to post in some camera forum about why this or that product sucks. They just use what they think will create the best photograph for them. That's all. There's no need to get religion about a workflow or a camera company. They pick one that works for them and they go shoot. While others engage in pointless, pedantic, time-wasting arguments over widget "A" being better than widget "B," the greats just keep getting greater by staying away from the religion. To the greats, it has always been, and will always be, about the picture. Nothing else matters.

3. They know what they want and they go for it. In a world where political correctness has run amok and where "buy-in" reigns, it's harder and harder to find people who will go for the gusto. It seems that the current generation of photographers is more concerned about making everyone else feel good than just going out there and grabbing the best image. This is hard to describe but I am sure I am on to something here. When you have the confidence to say, "This is the shot," then you are closer to greatness. When you feel the need to run that image by everyone from your priest to your camera club president for "feedback," then you're still lacking what it takes to be really, insanely great. The greats don't wait for permission. Ever.

4. They move ahead. The greats don't dwell on the past. Last year's photograph is last year's photograph. The greats are always thinking about the next great image. They move ahead. They don't worry about the image they missed. They enjoy the one they didn't miss. The greats don't let any excuse hold them back. They don't complain about their gear or their health or their lack of money or their…anything. They abandon past mistakes. They constantly seek the bleeding edge in their photography. The NEXT image is the one they spend the most time thinking about. When asked which of his photographs was his best, the great portrait photographer of more than 50 years Don Blair said, "I don't know – I haven't taken it yet."

5. They know what NOT to include in a photograph. John Shaw is one of the most widely-published nature photographers in the world. I once heard him say (and I have used this quote in my writings many times) "The difference between a professional photographer and an amateur photographer is that the professional knows what NOT to include in the photo." In this instance you can substitute "Great" for "Professional" and the meaning still holds. The great photographers acted as filters more than anything else. They looked at their subjects and immediately carved away all the distractions to reveal the beauty, or pain, or truth, or grace or whatever story they wanted to tell. A great photographer knows that a great photo is much like an onion. You have to peel away the skin to get to the good stuff. Great photographers work by process of elimination. They refine rather than mine. They dig deeper than the rest of us. Where we see a complex scene involving many subjects, they see one simple subject in all its glory.

The pursuit of greatness is not something everyone cares about. I was shocked when I first learned this. I've always just assumed that everyone wants to be great at what they do. Not so. Some folks are happy just getting by. I'm guessing you're not one of the people who think getting by is good enough because if you were, you wouldn't have taken the time to read this post. I congratulate you. Now, I'd also like to challenge you. Look through this list and see how many of these traits you do have. Spend time improving on those and adding to them. I hope to see great things come from you too.

scancafewide


Things you can do from here:


How to Prevent & Edit out Reflections on Glasses


Sent to you by mcleanfamily88 via Google Reader:


via Digital Photography School by Elizabeth Halford on 7/16/10

Subjects who wear eye glasses can offer a unique difficulty for photographers. First, there's the dilemma of whether they should wear them or not (will they not feel & look like themselves without them? Are they hiding fabulous eyes behind those glasses?) And then there's the problem of glare and reflection. An attentive photographer will pay attention to this factor, but it does cause issues and where a photo might be perfectly composed and lit, but a little glare in the glasses can throw the whole thing off.

{An Ounce of Prevention}

So first, I offer a few tips to prevent glare so you can see those eyes. Then, I'll give you a quick little tip for how I use editing software to soften the blow of glare when it does happen.

  • All those tips for creating great catchlights? Forget 'em. Reflectors aimed at the eyes, facing a light source…all these techniques will only show up as mirror-like reflections in the glass.
  • When using artificial or studio lighting, have your subject turn away from the lights just a tad and pay attention to what's going on in the glasses.
  • As if pop-up flash wasn't already a no-no, it's even more so when your subject is wearing glasses
  • A rather strange suggestion is to have your subjects tilt the glasses downward only 1/2 an inch (just push them up from where they rest on their ears). This tiny bit of angle and make a huge difference. In the same manner, you can also experiment with having them tilt their head or the angle from which you're shooting.

{A Pound of Cure}

If you couldn't avoid glare or didn't realise it was happening, there's a rather easy fix you can do in any editing program which allows for work with layers in your image. If you troll the web, you'll find a few ways to edit out glare and no one particular method is a cure-all method. You'll have to use the tools in your editing arsenal to draw on your creativity and what you know to do the trick. For the image below, these are the steps I took to remove the umbrella glare.

Original Image:

1. I used the healing brush tool on 'replace' mode with a very soft edged brush to replace the reflections using a sample of the area directly next to the reflection. In progress using the brush:

2. I sized down the brush and resampled using the black eye liner. I used the brush to draw on new liner, resampling the brush continuously throughout the process.

3. That's it! Check out the after:

Post from: Digital Photography School - Photography Tips.

dpsbook.png

How to Prevent & Edit out Reflections on Glasses


Things you can do from here:


I Finally Have an iPad App! Photo Recipes Live is here!


Sent to you by mcleanfamily88 via Google Reader:


pad2

My bestselling Book/DVD combo: Photo Recipes Live: Behind the Scenes Lighting Techniques, is now available as both an iPad and iPhone App from the iTunes Store.

pad3

The cool thing is: the App is only $9.95, and includes all the same videos and content. One of the reviewers on iTunes wrote this about the App:

"His technique of showing the shot, and then breaking it down how he did it, is very productive. The narrative is fun, not dry. $10 for pro instruction on lighting is a deal, the price of some digital photography magazines."

Anyway, if you'd like to check it out, you can find it right here. Thanks to my Publisher, Peachpit Press who developed the App and got it out there. They really did a great job with it, and I'm super psyched to have it available both as a App, and for such an affordable price.

pad1

pad4


Thursday, 15 July 2010

The Complete Guide For Photographing Live Insects At Home


Sent to you by mcleanfamily88 via Google Reader:


I started toying around with insect macro photography about 18 months ago. And to be honest, those first few months produced some amazingly bad photographs. But as scientists say, there is no such thing as a failed experiment - as long as it yields data. Well, I've managed to amass quite a lot of "data". And I am grateful that I am able to share some of that knowledge with the DIY community.

As bad as they were, those first few macro shots opened my eyes to the amazing detail and intricacies that lay just beyond the capabilities of our vision. Watching the insects move through the viewfinder was - and still is - a fascinating experience. So, from my earliest attempts, I decided I was going to only shoot live insects.

read more


Things you can do from here: